SEO
How to Improve Google Search Ranking: 12 Steps That Work (2026)
Learn how to improve Google search ranking with 12 practical steps — from fixing indexing and matching search intent to earning links and measuring progress, all with free tools.

 By Taylor Orlando
·November 3, 2026

Learning how to optimize images for SEO is one of the fastest wins for a small business website. Images are usually the heaviest part of a page, and search engines need clear clues to understand what each picture shows. Get both parts right — small files and clear descriptions — and your pages load faster, rank better, and show up in Google Images.
Last updated: November 2026
Image SEO means preparing your pictures so search engines can find them, understand them, and rank them. It covers the file name, the alt text, the file size, the format, and the size shown on the page. It is not just about alt text. A picture with perfect alt text but a 3 MB file still slows your page down, and a tiny picture named IMG_4821.jpg tells Google almost nothing.
Images matter for SEO in three ways. First, they affect page speed, and page speed is part of how Google judges page experience. Second, they can bring traffic on their own through Google Images. Third, good pictures keep visitors on the page longer, which is a sign the page was useful.
On most pages, images make up the largest share of the page weight. Data from HTTP Archive, quoted in recent image guides, puts images at roughly 40 to 50 percent of total page weight on an average web page. A single photo straight from a phone can be 4 to 8 MB. On a mobile connection, that one file can double how long the page takes to show.
Google measures this with Core Web Vitals. The most important one for images is Largest Contentful Paint (LCP), which tracks when the main content becomes visible. Google’s target is under 2.5 seconds. Since the main image is often the largest element on the page, an unoptimized hero image is the most common reason a page misses that target. Images without set width and height also cause layout shift, which Google measures as Cumulative Layout Shift (CLS) — the page jumps around as pictures load.
Once you know the steps, each image takes about two minutes. Do them in this order, before you upload — fixing files after upload takes much longer:
Start with a picture that matches the page. A product page needs a clear photo of the product. A how-to post needs a screenshot or a photo of the step being done. Stock photos are fine, but original photos help more, because no other site has the same image. Avoid pictures with a lot of text baked into them — search engines cannot read that text well, and it looks blurry on small screens.
For a featured image, aim for about 1,200 pixels wide. That size works well when the post is shared on social media, and Google notes that large images at least 1,200 pixels wide have a better chance of appearing in Google Discover.
This step saves more than any other. Do not upload a 4,000-pixel photo and let your theme shrink it with code — visitors still download the full file. Find out how wide the image shows on your site (most blog content areas are 700 to 1,200 pixels wide) and resize to that width before upload.
A simple example: a phone photo at 4,032 pixels wide and 8.7 MB, resized to 1,200 pixels wide and saved at good quality, drops to under 200 KB. Same picture, same look on the page, a file more than 40 times smaller. That is the whole point of image SEO in one step.
| Format | Best for | Notes |
|---|---|---|
| WebP | Most photos and graphics | About 25 to 35 percent smaller than JPEG at similar quality; the best default in 2026 |
| JPEG | Photos | Good quality at smaller sizes; no transparency |
| PNG | Screenshots and graphics with text | Sharp text, but much larger than WebP for photos |
| AVIF | Photos, when you want the smallest file | Even smaller than WebP, but older browsers may not show it — use WebP as a fallback |
| SVG | Logos and icons | Scales to any size with a tiny file; not for photos |
If your site already uses JPEG everywhere, switching new uploads to WebP is a safe first move. Most image tools and WordPress plugins can convert on upload, so you do not need to convert old files by hand right away.
Compression removes data your eyes will not miss. For photos, a quality setting of 80 to 85 usually looks the same as the original while cutting the file size a lot. As a target, aim for under 200 KB for a normal content image and under 100 KB where you can get it without visible loss. Hero images can be a bit larger, but still try to stay under 200 KB.
Free tools make this easy: TinyPNG and Squoosh handle one file at a time in the browser, and WordPress plugins such as Smush or ShortPixel can compress images as you upload them. If you use a plugin, check its settings once — set it to convert to WebP and strip the extra camera data (EXIF) from files, which also trims size.

Search engines read file names as an early clue about what a picture shows. Rename the file before you upload it, not after. Use lowercase letters, hyphens between words, and words that describe what is actually in the picture.
Three to six words is plenty. A clear file name also helps you find the picture again in your own media library six months later.
Alt text does two jobs. It tells screen-reader users what a picture shows, and it gives search engines context for Google Images. Google itself calls alt text the most important attribute for giving an image extra information. Write it for the first job and the second follows.
Good alt text says what is visible, in plain words, in about 5 to 15 words (under roughly 125 characters, because screen readers often cut off longer text). Put the keyword in only if it fits naturally.
Skip phrases like “image of” or “photo showing” — screen readers already say it is an image. For a purely decorative picture, such as a background pattern, use empty alt text (alt=””) so screen readers skip it instead of announcing it.
Beginners often mix these three up. Alt text is hidden code that describes the picture for screen readers and search engines. A caption is visible text under the picture that readers see — use it only when it adds something, such as crediting a source or explaining a detail. The title attribute is the small tooltip that appears on hover; it adds little for SEO and you can usually skip it. Do not copy the same sentence into all three. Write alt text for the picture, and a caption only when readers need it.
Without responsive images, every phone visitor downloads the full desktop-size file. WordPress handles much of this for you: when you upload a picture, it creates several sizes, and the theme serves the right size for each screen. You can check this by opening your page on a phone and seeing that pictures still look sharp without taking forever to load.
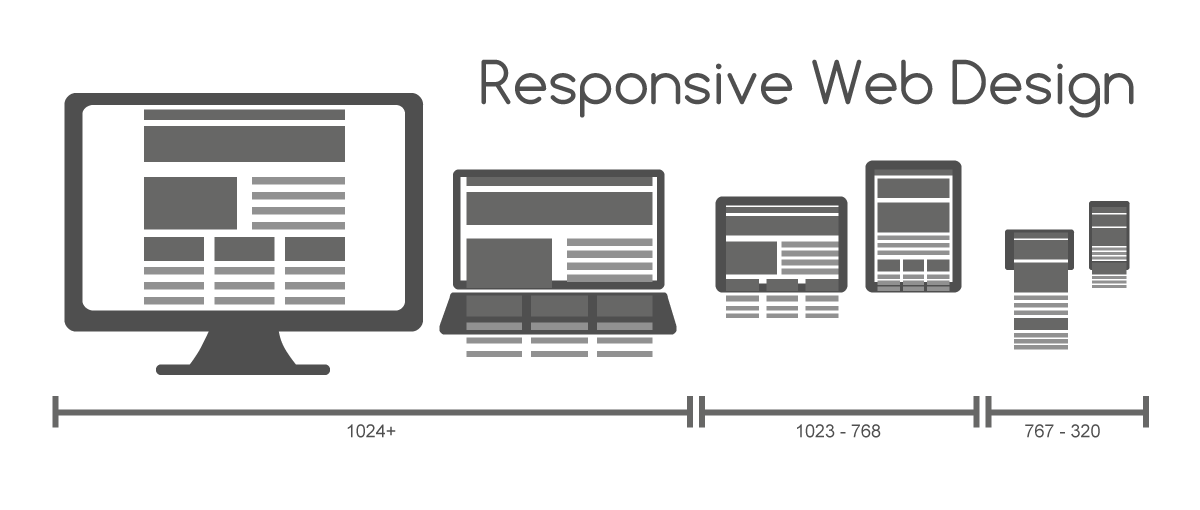
Two more settings matter. First, set width and height on your images (WordPress does this by default) so the page does not jump as pictures load. Second, lazy-load pictures further down the page, so they only load when a reader scrolls near them. WordPress adds lazy loading by default. Never lazy-load the main image at the top of the page — that is usually the LCP element, and delaying it hurts your speed score.
A few technical checks decide whether Google can even see your pictures. Use normal image tags in your content — Google does not index pictures set as CSS backgrounds. Make sure your robots.txt file is not blocking your uploads folder. And make sure your images are included in your sitemap; popular SEO plugins add post images to the XML sitemap on their own, so you only need to submit the sitemap once in Search Console.
For a deeper look at what Google recommends, read Google’s image SEO best practices guide, which covers discovery, responsive images, and speed in one place.
You do not need to fix every old picture at once. Start with your top 10 to 20 pages — the ones that already get traffic or bring in sales. Run them through PageSpeed Insights and note the image problems it lists: oversized files, missing alt text, and pictures in old formats. Fix those pages first, then work through the rest a few posts at a time.
For missing alt text, work in batches: open the Media Library, filter by pictures with no alt text, and fill in the worst ones first — product photos and featured images before decorative ones. For oversized files, a compression plugin can often shrink your existing library in bulk without re-uploading anything.
Alt text helps Google understand what a picture shows, which helps the picture rank in Google Images and supports the page’s topic. On its own it will not rank a weak page, but missing or stuffed alt text wastes an easy signal.
Resize to the width the picture shows at — usually 700 to 1,200 pixels wide for blog content — and compress to under 200 KB. A featured image about 1,200 pixels wide suits most themes and social sharing.
Yes, for most photos. WebP files are roughly 25 to 35 percent smaller than JPEG at similar quality, which helps page speed. Keep a JPEG fallback only if you still serve very old browsers.
No. Give decorative pictures empty alt text (alt=””) so screen readers skip them. Alt text is for pictures that carry meaning.
Yes. Pictures with clear file names, honest alt text, and relevant surrounding text can show up in Google Images and send visitors to the page, especially for product, recipe, how-to, and design searches.
Run the page through PageSpeed Insights and read its image suggestions: it flags oversized files, old formats, and pictures served larger than their display size, with the savings each fix would give.

Taylor Orlando is a content writer at Meregate covering websites, SEO, and AI. Taylor breaks down complex topics into simple, practical guides that help small businesses build better websites, rank higher on Google, and get real value from AI tools — no jargon, no fluff.
Learn how to improve Google search ranking with 12 practical steps — from fixing indexing and matching search intent to earning links and measuring progress, all with free tools.

There is no magic posting number. For most small sites, one or two genuinely useful posts a week beats daily thin content. Here's how to choose your pace.
Page Authority is Moz's score for one single page. This guide explains what it measures, what counts as a good score, and the honest ways to raise it.